Friday, July 5, 2013

Opening Encyclopedia 2013


Chess Base has come out with a new Opening Encyclopedia for 2013.

Albert Silver, in his review, was quite impressed, noting "It quite literally comes with more material than you could view in a lifetime, or several lifetimes..." and reassuring readers "it has material to answer your questions in every chess opening there is."

He continues
Don’t think this is only about mainline theory either. Although you will assuredly find every nook and cranny of the Najdorf, Gruenfeld and QGD being scrutinized, you will also find a wealth of material on offbeat lines such as the Fajarowicz Gambit (two articles), the From Gambit, the Evans, the Snake Benoni, the Keres Defense, the Latvian Gambit, the Elephant Gambit (eight articles) and every oddball line that may tickle your fancy. Someone played a gambit or line at your club or online and you had no idea what to do? Rest assured, there is an article here to enlighten you.
Wow.

I wrote ChessBase immediately
I was impressed by Albert Silber's review of Opening Encyclopedia 2013. Tell me that it covers the Jerome Gambit (1.e4 e5 2.Nf3 Nc6 3.Bc4 Bc5 4.Bxf7+ and I'll reach for my wallet.
We shall see... 

Wednesday, July 3, 2013

Jeromezzzzzzzzzz... Gambit


Somehow, the following game escaped being posted here shortly after being played, three years ago. Perhaps I tried to put it up, but kept falling asleep.

It is another example of the Jerome Countergambit, and it shows that leaving White a pawn up is not a guaranteed win for the first player, or loss for the second.


perrypawnpusher - superlopez

blitz, FICS, 2010

1.e4 e5 2.Nf3 Nc6 3.Bc4 Bc5 4.Bxf7+ 


4...Kxf7 5.Nxe5+ Nxe5 6.Qh5+ Kf8 7.Qxe5 Bxf2+ 


The Jerome Countergambit.


Black reasons that if there is anything useful in the Bishop sacrifice, he would like to have a bit of it as well. Also, he gets to exchange Queens and blunt White's attack.


8.Kxf2 Qh4+ 9.g3 Qf6+ 10.Qxf6+ Nxf6 


What I remember from my first chess book, Chess the Easy Way, by Fine, is that all White has to do now is exchange down to the K + P vs K endgame and collect the point. Of course, it has been about 50 years since I read the book, so maybe I am simplifying it in my mind...


11.Nc3 d6 12.d3 Kf7 13.Bg5 Rf8 14.Bxf6 Kxf6 15.Ke3 Ke7 16.Nd5+ Kd8 


17.Rhf1 Rxf1 18.Rxf1 c6 19.Rf8+ Kd7 20.Nc3 Ke7 21.Rh8 h6 22.Ne2 b6 23.Nf4 


Here I missed a chance to grab another pawn with 23.Nd4 Bb7 24.Nf5+ Kf6 25.Rxa8 Bxa8 26.Nxd6. 


23...Bb7 24.Rxa8 Bxa8 25.d4 Kf6 26.h4 c5 27.dxc5 dxc5 28.c4 g5 29.hxg5+ hxg5 30.Nd5+ Ke5 


White has a pawn advantage, but Black's active King and Bishop vs Knight give the second player significant drawing chances (especially in blitz).


31.Nc3 a6 32.a4 


Still thinking in a static manner, whereas 32.Nd5 b5 33.Nc7 Bxe4 34.cxb5 axb5 35.Nxb5 would have won a useful second pawn.


32...Bc6 33.b3 Bb7 34.Nd5 


34...b5


Actually, Black has established a very strong blockade of White's pawns and pieces, and he probably could have held the game after 34...Bc6! for example 35.Nxb6 a5 36.Nd5 Bb7 37.Kf3 Bc8 38.Nc3 Bd7 39.Nd5 Bc8 40.Nc7 Kd4 41.Nb5+ Ke5 42.Ke3 Bg4 and it is hard seeing White make any headway.


35.axb5 axb5 36.Nc3 


More plodding play, when 36.cxb5 was the right move, as 36...Bxd5 37.exd5 Kxd5 is answered by 38.Kf3 and success on the Kingside.


36...bxc4 37.bxc4 Ba6 


Again, 37...Bc6 contained the drawing idea. 


38.Nb5 Bc8 39.Nc3 Bh3 40.Na4 Bf1 41.Nxc5 Bxc4 42.Nd3+ Ke6 43.Nc5+ Ke5 


44.Nd7+ Ke6 45.Nc5+ Ke5 46.Nd7+ Kd6 


Black does not want the draw by repetition of position. He should have been happy with 46...Ke6.


47.Nf8 Bf1


The Bishop needed to go to g8 to help continue the blockade. Now White makes progress.


48.Nh7 g4 49.Nf6 Bh3 50.Kf4 Ke6 51.e5


Playable was 51.Nxg4


51...Kf7 52.Ne4 Ke6 53.Nf2 Kd5 54.Kf5 Kd4 55.e6 Bf1 56.e7 Bb5 57.Nxg4 


57...Kd5 58.Nf6+ Kd6 59.e8Q Bxe8 60.Nxe8+ Ke7 61.Nf6 Kf7 62.g4 Kg7 


63.g5 Kf7 64.Nh5 Kg8 65.Kf6 Kf8 66.g6 Kg8 67.g7 Kh7 68.Kf7 Kh6 69.Nf6 Kg5 70.g8Q+ Kh6 71.Qg6 checkmate


After this game and the one in the last post, I got to thinking that it might be time to go through some standard Jerome Gambit endgames. Of course, Bill Wall sent one right away.

Monday, July 1, 2013

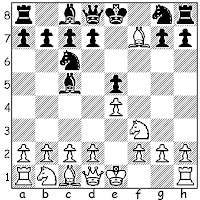
Jerome Countergambit


The following game could just as easily be called "Buttons, buttons, who's got the buttons?" because White wins in the end simply because he has more buttons - er, pawns.

An interesting question of Jerome Gambit nomenclature comes up, however, hence the title of today's post (and the graphic of the counter-puncher).

Wall, Bill - Guest545050
PlayChess.com, 2013

1.e4 e5 2.Nf3 Nc6 3.Bc4 Bc5 4.Bxf7+


4...Kxf7 5.Nxe5+ Nxe5 6.Qh5+ Kf8 7.Qxe5 Bxf2+ 


Bill Wall suggests that this variation be called the Jerome Countergambit. I think that name is appropriate, as, in the Jerome Gambit, Black executes the same Bishop sacrifice that White played earlier. However, I would like to expand the name to the whole strategy of Black's counter-sacrifice.

Interestingly, in The Database I found only 8 other examples of 7...Bxf2+ as in the current game.

After a different defensive line, however, that of 6...g6 (instead of 6...Kf8) 7.Qxe5 Bxf2+, I found 84 examples.

While readers may not be surprised that after 6.d3 (instead of 6.Qh5+ as in the game) I found only 1 example of the countergambit 6...Bxf2+, it might be shocking to discover that in the "modern" Jerome Gambit line 5.d3 (instead of 5.Nxe5+) there are 842 examples of 5...Bxf2+.

Over the years there have been a number of comments about the ideas behind the Jerome Countergambit, from the thoughts of Brian Wall to today's game by Bill Wall. As for me, I've written a memo: More to explore!

8.Kxf2

Wouldn't you know, one Jerome Gambiteer, the venerable DREWBEAR 63, tried the counter-psych, 8.Ke2!?, and won in 43 moves, in DREWBEAR 63 - Crusader Rabbit, Jerome Gambit Tourney 4, ChessWorld 2009.

8...Qf6+

The alternative, 8... Qh4+, in true Jerome Gambit style, showed up in perrypawnpusher - superlopez, blitz, FICS, 2010 (1-0, 71), which apparently, somehow, was never posted here. (I'll remedy that in a few days.)

9.Qxf6+ Nxf6 

As I've mentioned elsewhere, recently, in a similar situation, "Black has an even game. However, given that he had a won game at move 4, this is not actually progress". Actually, things are worse in this particular case, as Black's exchange of Queens has left him a pawn down.

10.Nc3 g6 

Or 10... d6, as in perrypawnpusher - Lindal, blitz, FICS, 2007, (1-0, 45) 

11.d4 d6 12.Bg5 Kg7 

Moving too quickly. (For a recent, similar example, see "By the Numbers".)

As I've said before: as "bad" as the Jerome Gambit is, it still demands the defender's full attention.

13.Bxf6+ Kxf6 14.Nd5+ Kg7 15.Nxc7 Rb8 16.Nb5 Rf8+ 17.Ke2 Bg4+ 18.Ke3 Rbd8 19.Nxa7 Rde8 


20.Nb5 d5 21.e5 Bf5 22.Nd6 Ra8 23. Nxf5+ Rxf5 24.g4 Rf7 25.h4 Raf8 

26.Rh3 Rf4 27.g5 b5 28.a4 bxa4 29.Rxa4 Rf2 30.Ra7+ Kg8 31.Rc7 Black resigned
Black has nothing against the Queenside buttons.

Saturday, June 29, 2013

Flash


Depending upon your view of lightning chess, the Jerome Gambit may a very good - or very bad - fit for such hectic play.

In the following game, Black's quick-play strategy is to move his pieces, not his pawns. This falls right into White's hands, however.

KingDeath - FoxTerrier
lightning, FICS, 2013

1.e4 e5 2.Nf3 Nc6 3.Bc4 Bc5 4.0-0 Nf6 5.Bxf7+


Transposing to a "modern" variation of the Jerome Gambit - 4.Bxf7+ Kxf7 5.0-0 Nf6

5...Kxf7 6.Nxe5+ Nxe5 7.d4 Bxd4 8.Qxd4 Nc6 9.Qc4+ Kf8


10.Bg5 Qe7 11.Nc3 Qe5 12.f4 Qe8 13.e5 Ng8


14.Nd5 Qf7 15.Qc5+ 

Black forfeited on time.

A good exercise is to see how many times a pawn move would have suited Black better than the move he chose. (My guess is at least on moves 9, 10, 11, 13 and 15.)

Thursday, June 27, 2013

Pwned!


In this last look at 6.c3 line in the 5...Ke7 defense to the Blackburne Shilling Jerome Gambit (see "Variation on A Theme" and "Long Lines: Seeing Unclearly") we see a game which is mostly about pawns.

As if that were not enough. 


Kuskus - omarrafi

blitz, FICS, 2009

1.e4 e5 2.Nf3 Nc6 3.Bc4 Nd4


The Blackburne Shilling Gambit. 


4.Bxf7+


The Blackburne Shilling Jerome Gambit.


4...Kxf7 5.Nxe5+ Ke7


6.c3 d6 7.cxd4 dxe5 8.dxe5 Qd3


An alternative mentioned in the previous game.


9.Qe2 Qxe2+ 10.Kxe2 


It is not likely that Black was thinking of this position when he played 3...Nd4.


10...Be6 11.d4 c6 12.f4 Rd8 13.Ke3 Ke8 14.Nc3 Bb4 15.f5 Bc4


So far, White's position has largely been playing itself, but now, in the next few moves, Black contributes to the pawns' mobility.


16.Bd2 c5 17.d5 Nh6 18.Kf4 g5+ 


Apparently not expecting White's next move.


19.Kxg5 Nf7+ 20.Kf4 Bxd5


Giving a piece back for a couple of pawns, but it is not enough.


21.exd5 Bxc3 22.Bxc3 Rxd5 23.e6


This is what Black overlooked 


23...Rf8 24.exf7+ Rxf7 25.Rhe1+ Kd7 26.g4 h5 27.h3 Rd3 28.Rad1 


Black resigned


White has the extra piece and the extra pawn.


Tuesday, June 25, 2013

Long Lines: Seeing Unclearly


Continuing to look at the 6.c3 line in the 5...Ke7 defense to the Blackburne Shilling Jerome Gambit (see "Variation on A Theme"), here is a game that quickly becomes wildly complicated. 

I have used Houdini 3 to try to give some guidance, but the long lines of play it suggests sometimes seem to lead from "unclear" to "unclear". Or, as the old children's song used to go, "Some kind of  help is the kind of help we all can do without."


(Still, it is worth playing over the computer's lines, for its cold-blooded, dynamic play.)

paoloumali -manicwild

standard, FICS, 2011

1.e4 e5 2.Nf3 Nc6 3.Bc4 Nd4


The Blackburne Shilling Gambit.


4.Bxf7+ 


The Blackburne Shilling Jerome Gambit.


4...Kxf7 5.Nxe5+ Ke7


An overlooked line recently reviewed in "Bypassed in Time".


6.c3 d6 7.cxd4


White decides not to withdraw his Knight.


7...dxe5 8.dxe5 Qd4 


Black's alternative, 8...Qd3, may be a tiny bit better.


9.Nc3 Ke8 10.Qh5+ g6 11.Qg5 Bc5 


The reason behind Black's King's retreat.


Houdini 3 prefers to see the Bishop on the long diagonal: 11...Bg7

12.Qh4 Bxe5 13.O-O h6 14.d3 Qd8 15.Qxd8+ Kxd8 16.d4 Bg7 17.Be3 Ne7 18.d5 Bd7 19.f4 Rf8 20.Rac1 b6 21.h3 Rc8 22.Kh2 a6 23.Rc2 
analysis diagram


with a small advantage to Black. 


However, White has two pawns for his sacrificed piece and Black's King is still trapped in the  middle of his first rank, so the position should not be painful for a hardy Jerome Gambiteer.


12.O-O Ne7 


Black is developing reasonably, but Houdini 3 again takes issue, saying that this gives White a small advantage, and suggesting 12...Qd3 13.Nd5 Bb6 14.Re1 c6 15.Nxb6 axb6 16.Re3 Qd4 17.d3 Be6 18.a3 Kd7 19.Re2 Kc7 20.Be3 Qd8 21.Qg3 Kb8 22.Rc1 Ra4 23.Rd2 Ne7 24.Qh4 Nc8 25.Qf6 Bb3 

analysis position


with an even game.

Um, okay.


13.Nb5


Of course, this play is too straight-forward for Houdini 3, which recommends 13.d3 h6 14.Qg3 Qd7 15.Be3 Bb4 16.e6 Qxe6 17.Nb5 Bd6 18.Nxc7+ Bxc7 19.Qxc7 Rh7 20.Rfe1 Rf7 21.d4 Qf6 22.Qc2 g5 23.d5 Kf8 24.Rad1 Kg8 25.Bd4 Qd6 26.Rc1 b6 27.Qc7 

analysis diagram


with an advantage to White. 

Black has castled-by-hand, but his Queenside development (note the typical Bishop on c8 blocking in the Rook on a8) still lags.

13... Qd7 14.a4 b6 


A blunder, although it may not be easy to see.


Once again, Houdini 3 comes to the "rescue": 14...Bb6 15.e6 Qxe6 16.a5 h6 17.axb6 hxg5 18.Nxc7+ Kf7 19.Nxe6 Bxe6 20.d4 Bc4

21.Re1 axb6 22.Bxg5 Rhc8 23.d5 Ke8 24.f3 Kd7 25.Rec1 b5 26.Kf2 Ra4 27.Kg3 Ng8 28.Be3 Nf6 29.Rxa4 bxa4 30.Kf4 
analysis diagram


White's three extra pawns balance Black's extra piece, and perhaps offer a whisper of an advantage.

15.e6


Taking advantage of the unfortunate placement of Black's Royal Family.


15...Qc6


Safer was 15...Qd3 although you've probably had enough of Houdini 3's ideas for the moment.


16.Qf6


This looks strong to me, but Houdini 3 has a conniption fit, preferring, instead 16.d4 Bxe6 17.Qe5 Bd6 18.Qxh8+ Kd7 19.Qxh7 Qxe4 20.Bg5 Re8 21.Rfe1 Qf5 22.Qh4 Nd5 23.Rac1 Qf8 24.Qh7+

Qf7 25.Qxf7+ Bxf7 26.Rxe8 Bxe8 27.Nxa7 Bf7 28.Nc6 Nb4 29.Ne5+ Bxe5 30.dxe5 Bb3 31.Bd2 Nc6 
analysis diagram


when White is up the exchange and a few pawns.

16...Rf8 17.Qe5 


17...Kd8 


Missing the defense 17...Bd6 18.Nxd6+ cxd6 19.Qd4 Qc5 20.Qd3 Nc6 21.Ra3 Bxe6 22.Rc3 Nb4 23.Qe2 Qh5 24.Qxh5 gxh5 25.b3 Kd7 26.Ba3 Na6 27.d4 Rac8 28.Rfc1 Rxc3 29.Rxc3 Rg8 30.d5 Bf7 31.Rf3 Be8 

analysis diagram


with Black for choice, according to Houdini 3 (although I like White's pawns). 

18.d4 Bd6 19.Nxd6 cxd6 20.Qg7 Re8 21.d5 


Here Black forfeited by disconnection.


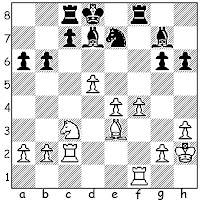
In the final diagram, the defender's position is horribly congested, and White is about to add Bg5 to the painful cramp. Among other things, White threatens to win Black's Kingside pawns and advance his 5-0 (!) majority; while the c-file will also beckon to one of his Rooks. Returning a piece with ...Bxe6 will not solve much for Black.