Saturday, November 4, 2017

Jerome Gambit: Pay Attention

Image result for free clip art ouch

In the Jerome Gambit, Black and White face the same challenge: paying attention. Black often is in an unfamiliar and risky situation, and must be aware of dangers as they arise. White has to apply pressure, and be ready to pounce when Black lowers his guard - and, the more the pressure he applies, the greater opportunity he has to pounce.

The following game shows this, as everything is calm and routine - until checkmate. Ouch.

Wall, Bill - Guest522870
PlayChess.com, 2017

1.e4 e5 2.Nf3 Nc6 3.Bc4 Bc5 4.Bxf7+ 


4...Kxf7 5.Nxe5+ Nxe5 6.d4 


Alonzo Wheeler Jerome's first choice, before moving on to 6.Qh5+, and Bill's current preference. It is less forcing, which means, among other things, that it gives less direction for Black in preparing his defense.

6...Bxd4 7.Qxd4 d6 8.O-O Nf6 9.Nc3 Rf8 


Black is planning on castling-by-hand, a good defensive strategy. He should not allow himself to be distracted.

10.f4

A standard move in this kind of position: kick the Knight on e5 and get the "Jerome pawns" moving, with the possibility of a pawn advancing to e5 or f5. An alternative was the developing 10.Bg5

10...Neg4 

Bill has also faced the more restrained 10...Nc6 in Wall,B - Anonymous, lichess.org, 2016, (1-0, 19) and Wall,B - Anonymous, lichess.org, 2016 (1-0, 46).

11.h3 c5 

It is often a good idea to meet an attack on one of your pieces with an attack on one of your opponent's pieces. Here, Black's pawn attack on the enemy Queen forces White to ignore the threat to the Knight on g4.

12.Qc4+ Be6 

How to answer the Queen check is a standard concern in some lines in the Jerome Gambit. Black is happy to respond to the check by developing a piece, probably a bit better than the alternative, 12...d5.

13.Qd3 Nh6 14.f5 Bd7


Black plans on giving up his pawn on d6, in order to reposition his Bishop on c6, pressuring White's pawn on e4. There is a problem with this idea, however, which means that the proper move was 14...Bc8.

15.Qxd6 Bc6 6.Qe6 checkmate


Oh, yeah, that.

Thursday, November 2, 2017

Jerome Gambit: More or Less (Part 2)


[continued from previous post]


perrypawnpusher - scarsetto
5 5 blitz, FICS, 2017


What is going on?

Here we have the position from a recent blitz game of mine, before I played the decent 11.Nc3, believing that an extra piece would help weave a mating net. This is opposed to Stockfish 8's suggestion of 11.Qb3+, which would lead (perhaps after a long and winding road) to a win of material and a simple advantage for White. 

Years ago, I had played 11.d4, which, I later noted on this blog, was insufficient, as 
after 11...Bb4+ 12.c3 Bf8 it is not clear that White has anything more than checking his way repeatedly to a draw.
That is such an annoying assessment, let me show the position:


Drawn??


analysis diagram


I let Stockfish 8 analyze until a depth of 30 ply, without finding anything better than forcing a draw. I suspect, though, strong Jerome Gambiteers would simply castle and figure out the rest later...

By the way, instead of entering the recommended line in that 11.d4 game, my opponent immediately returned his extra piece with 11...Bxd4 and I was able to win the game in 46 moves, perrypawnpusher - hotintheshade, blitz, FICS, 2009. Once again, my "unscientific" opening was assisted by my opponent's "scientific" response - in this case, following the notion that a sacrificial attack can be blunted by returning material.

Back to the recent game.


11...Qh4+ 

There is something really silly about me going through a pile of analysis - after the game, in preparation for this post (and the previous one) - only to have it all wiped out by the reality of what really happened. Perhaps I was right to "move first and think later" after all.

Black can definitively show that there is no checkmate by playing the alternative 11...a5, when White gets his piece back with 12.Na4+ (the idea behind 11.Nc3, which is why I played the move in the first place) Ka7 13.Qxc5+ b6 14.Qd4 Bb7 15.0-0 when White would still be better.

Years earlier, I had faced 11...d6, which should have led to the quick 12.Qb3+ Bb4 13.Qxb4+ Ka6 14.Qb5 checkmate, but led, instead, to the obvious 12.Na4+ Ka6, when I missed 13.b4!? - but won the game, anyhow,  perrypawnpusher - Ondras, blitz, FICS, 2012 (1-0, 31). I'm always so much smarter after the game.

It is worth playing over the lines until you, too, can decide - mate or material?

12.g3 Qh3 

While a sudden Queen check can often upset a position, the problem here is that the enamy Queen has to dodge the pawn, and my attack can continue. Still, if the Black Queen can get to g2...

Interestingly enough, the text is not an improvement over the previous 12...Qf6 13. Na4+ (even stronger 13.Qb3+!? Kc6 14.Qb5+ Kd6 15.e5+ winning the Queen) 13...Ka6 14.Nxc5+ Kb5 15.a4+ Kb6 16.a5+ Black resigned, sabreman - Lovebuzz, FICS, 2014.

13.Na4+ 

Winning material, but missing the move 13.b4!?, which leads to mate: 13...Bf2+ 14.Kxf2 Qh5 15.f5 Ng4+ 16.Kg1 Qxf5 17.exf5 a5 18.Qc5+ Ka6 19.Qxa5#.

White is still much better after the text, and it is possible that in the game (blitz) I didn't have (take) time to analyze the position out to checkmate - but for sure this kind of position should yield deadlier results next time.  

13...Kb5 

Black is in a bad way. He would last longer with 13...Ka6, and in a blitz game - with clocks ticking - that would have given him chances to survive, if my time expired. Nonetheless, against that move White can grab back material, build an attack, and eventually checkmate: 14.Nxc5+ Kb6 15.Na4+ Ka6 16.b4!? b5 17.Nc5+ Kb6 18.a4 (I need another piece in the attack) c6 19.Qd6 a5 20.d3 (opening a line for another piece) Qe6 (nothing works for Black now) 21.bxa5+ Rxa5 22.Qb8+ Bb7 23.Qxb7+ Kxc5 24.Ba3+ Kc4 25.Kd2 b4 26.Qxb4+ Qc4 27.Qxc5 checkmate.

That's a long line, but pretty straight-forward.

14.Qxc5+ 

Funny. I had my mind set on one thing, and one thing only. Of course, White had, instead, 14.c4+ Kxa4 first, then 15.Qxc5 Qf1+ (delaying the inevetible) 16.Rxf1 b6 17.b3#.

A win is a win is a win; but a checkmate is a good idea, too.

14...Kxa4 

The ultimate psychological slip. So many of us have grown up playing over games of the masters featuring sacrificial frenzies that lead to glorious finishes. How easy it is, when on the receiving end, to figure "I am lost!" and succumb in classic style.

Again, if time were not a factor, Black could choose a tougher line of defense: 14...Ka6 15.Qxc7 b6 16.b4!? Qe6 17.Nc5+!? bxc5 18.b5+!? Kxb5 19.Rb1+ Ka4 20.0-0!? Qc4 21.Rf3 (that's why White castles) Qd4+ (delaying the inevitible) 22.Kg2 Qxd4 23.Qxc5 Qe2+ 24.Kg1 Qe1+ 25.Rf1 Qxf1+ 26.Kxf1 Ba6+ 27.Kg1 d6 28.Rb4#

All these tactical lines were uncovered by Stockfish 8 after the game.

If the reality is that my opponent did not find the most spirited way to defend, it is even more true that I did not find the most effective way to attack. We both stumbled; he fell. The Jerome Gambit is very much like that.

15.b3 checkmate


(If you ignore the analysis in the notes, it looks like a killer game. More or less.) 

Tuesday, October 31, 2017

Jerome Gambit: More or Less (Part 1)


I still haven't had many opportunities to play chess lately, and when I have had the chance, I haven't been able to reach the Jerome Gambit. This has been a bit frustrating, as I know that in the earlier years of this blog I was able to share my adventures - good and bad - and trace out a path, as it were, sharing history, perspective and analysis, through this strange chess land.

Fortunately, readers of this blog have shared their games and analysis, and that has kept things moving. I hope you have appreciated their play. I certainly have.

Just the other day I was finally able to play an online blitz Jerome Gambit. As with many of my matches, there is both more and less there than meets the eye. Let me see if I can explain... 

Certain themes show up over and over in the game, the notes, and earlier games, and choosing among them is the challenge.

perrypawnpusher - scarsetto
blitz 5 5, FICS, 2017

1.e4 e5 2.Nf3 Nc6 3.Bc4 Bc5 4.Bxf7+ 


4...Kxf7 5.Nxe5+ Nxe5 6.Qh5+ 

I know that Alonzo Wheeler Jerome initially preferred 6.d4, but he never ran into the "pie-in-the-face variation" 6...Qh4!?.

I think I have tried 6.d4 only once, and, managed to swindle my way to a draw, after, of course, 6...Qh4. - perrypawnpusher - 4xe1, Chess.com, 2017 (1/2-1/2, 29).

For the record, The Database has 3,850 games with 6.Qh5+ (White scores 55%) and 1,608 games with 6.d4 (White scores 54%). Pretty even results.

6...Ke6 

The only other time that I have played scarsetto, a few years ago, he tried 6...Ng6 here. A dozen moves later, I hung my Queen: 7.Qd5+ Ke8 8.Qxc5 d6 9.Qe3 Nf6 10.O-O Kf7 11.f4 Rf8 12.f5 Ne5 13.d4 Neg4 14.Qd3 Kg8 15.h3 Bxf5 16.Rxf5 d5 17.hxg4 dxe4 18.Qxe4?? Nxe4 White resigned, perrypawnpusher - scarsetto, FICS, 2014. Ouch.
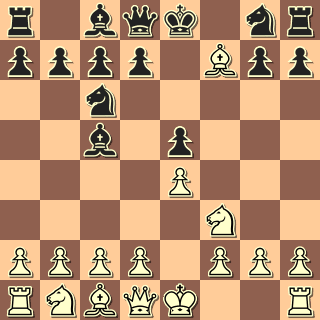
7.Qf5+ Kd6 8.f4 Nh6 


Black develops a piece, attacking White's Queen, making room for his Rook to come to f8, and not preventing his Queen from coming, if she wishes, to f6. Taken separately, these are good things, but they do not fit well in the current position - a sign of a defender who has either been surprised by the Jerome Gambit, knows little about it, or treats it with disdain.

Those who play the Jerome Gambit should take a look at the diagram and decide what they would do next. For encouragement, I can point out that there are 8 examples of this position in The Database. White scored 100%.

(It should be pointed out that there are only 3 games in The Database that contain Stockfish 8's recommendation, 8...Kc6, simply giving up the Black Knight. However, Black won all of them.)

9.Qxe5+ Kc6

Here perrypawnpusher - GPP, blitz, FICS, 2010 was awarded to White by ajudication. I was surprised, acutally, as previous ajudications that I had encountered seemed to have been based on simply counting up the material each side has - and here Black still has a piece for two pawns. That raises a couple of important questions: What is White's advantage? How does he win? 

10.Qd5+ Kb6 

It seems pretty clear at first glance that White has the advantage - Black's unsafe King is more significant than White's small material deficit. But does White have a checkmate, or will he merely win back another piece and hold a small advantage? In a blitz game, it is important to know which goal you are chasing after.

11.Nc3 

I was betting on "checkmate", although I hadn't analyzed how.

If Bobby Fischer ever said "Long analysis, wrong analysis" he probably also said "No analysis - you better have a ton of experience in that position and an awesome memory" (or, maybe not).

The computer places its bet on "win back another piece". Best according to Stockfish 6 is 11.Qb3+!?

To understand the recommendation move (beyond "patzer sees check, patzer gives check") it is only necessary to look at Black's possible response, 11...Kc6, when a reasonable continuation would be 12.Nc3 d5 13.Qb5+ Kd6 14.e5+ Ke6 15.Qxc5 and White is up a couple of pawns while Black's King is still uneasy.

A steadier response for Black is 11...Ka6, when White has to find 12.Qa4+ Kb6 13.b4!?, threatening to win the Bishop outright and making it possible to put his dark-squared Bishop on the long a1-h8 diagonal. Stockfish 8 recommends the return of the piece immediately with 13...Bxf2+, which shows a pretty good sense of humor for a computer.

Bishop retreats for Black complicate the position, and one example will show how. After 11...Ka6 12.Qa4+ Kb6 13.b4!? Be7 White has a whole lot to figure out, in a short amount of time: 14.Qa5+ Kc6 15.Nc3 a6 16.b5+ Kd6 17.Qb4+ Ke6 18.Qb3+ d5 19.Nxd5 Kf7 20.Nxc7+ Kg6 21.f5+ Nxf5 (returning the piece is best) 22.exf5+ Bxf5 


analysis diagram


Here, White is a couple of pawns up, and should continue to pressure Black with 23.Qg3+, or at least 23.0-0. He should not grab the a8 Rook, as that would be a delightful blunder, leading to immediate crushing pressure on his own King, starting with 23.Nxa8? Bh4+ 24.g3 Re8+, etc, and if White's King survives, his Queen won't. 


Eight years ago I played, instead of 11.Nc3 or 11.Qb3+, the central push 11.d4 - but that leads down another road, so perhaps that is best looked at in the next post.


[to be continued]

Sunday, October 29, 2017

Jerome Gambit: Casual Play

One of the biggest criticisms of the Jerome Gambit is its early Queen play by White. In the following game, White is able to use his Queen to win back material - and then has her wander around, apparently doing little. Yet this "casual" play by White seems to inspire equally "casual" play by Black - with deadly consequences.

Wall, Bill - Guest1018320
PlayChess.com, 2017

1.e4 e5 2.Nf3 Nc6 3.Bc4 Bc5 4.Bxf7+


4...Kxf7 5.Nxe5+ Nxe5 6.d4 Bd6


FYI, Bill is 15-0 against this line. It is playable, but it is not a "refutation" of the Jerome Gambit.

7.dxe5 Bxe5

Best is 7...Bb4+ with a slight edge to Black.

8.Qd5+ Kf8 9.Qxe5 d6 10.Qa5


Bill's Queen likes to wander:

10.Qd4 Nf6 11.O-O c5 12.Qd3 Bd7 13.Bf4 a6 14.Bxd6+ Kf7 15.e5 Bb5 16.c4 Black resigned, Wall,B - Guest5856753, PlayChess.com, 2016; and

10.Qb5 Nf6 11.Nc3 c6 12.Qd3 Be6 13.Bg5 h6 14.Bh4 g5 15.Bg3 Ke7 16.O-O-O Ne8 17.f4 g4 18.Bh4+ Nf6 19.e5 dxe5 20.Qg6 Qf8 21.fxe5 Black resigned, Wall,B - NN, lichess.org, 2016.

By the way, please note: White has recovered his sacrificed material and is a pawn ahead. He is in no hurry to "force" things, but, instead, allows Black to come up with "something".

10...b6 11.Qb5 a5 12.Nc3 Ba6


To prevent White from castling Kingside.

13.Qf5+ Qf6 14.Qh3 Ne7 15.Be3 Bc4 16.O-O-O


No hurry. No hurry. 

16...Be6 17.Qg3 h6 18.f4 g5


Opening the f-file when the Black Queen is in front of her King should be inherently risky, but this move also opens up the a1-h8 diagonal, where the Queen is in front of one of her Rooks.

19.Bd4 Qxf4+ 20.Qxf4+ gxf4 21.Bxh8 Black resigned


Friday, October 27, 2017

Jerome Gambit: It's Hard to Believe

The following game defies appearances. A glance suggests that Black is doing okay - although the game has begun to move against him. Another glance - and all looks fine, but definitely is not. A final glance - Black is being crushed.The whole battle reflects upon the skill of the Jerome Gambiteer - and highlights the strangeness the opening often brings.

Wall, Bill - Uli
PlayChess.com, 2017

1.e4 e5 2.Nf3 Nc6 3.Bc4 Bc5 4.Bxf7+ 


4...Kxf7 5.Nxe5+ Nxe5 6.d4 Bxd4 7.Qxd4 d6 


8.Nc3 Nf6 9.O-O Be6 10.b3 

Planning to put the dark-squared Bishop on the long diagonal. Bill has also played the straight-forward 10.f4 in Wall,B - Guest3746555, PlayChess.com, 2015 (1-0, 35). 

10...c5 

Or 10...Rf8 11.f4 Nc6 12.Qd3 Kg8 13.Bb2 Bg4 14.Rae1 Kh8 15.Nd5 Nxd5 16.exd5 Bf5 17.Qg3 Qd7 18.dxc6 bxc6 19.Qg5 Bxc2 20.Re7 Black resigned, Wall,B - NN, lichess.org, 2016

11.Qd2 Qc7 

It is tempting for Black to kick the White Queen with the c-pawn, but this always risks making Black's d-pawn weak (backwards on an open file). In this particular position, the pawn loss would not be critical, and Black would still hold the advantage - but it makes a world of a difference if he is simply "letting go" of the pawn or "overlooking" its fate.

12.f4 Nc6 13.Nb5 Qb6 14.Nxd6+ 


14...Ke7

Interestingly enough, this is an error. Black would have kept things mostly even with 14...Kg8.

15.e5 Nd5 


Again, Black's extra piece and advantage in development would suggest that he is fine. Alas, he is losing.

16.c4 Ndb4 17.Bb2 Rad8 18.f5 Bg8 


In a curious mirror image, Black's light-squared Bishop is on its home rank, preventing the development of the other Rook. This bodes poorly for the defender.

19.Qg5+ Kf8 20.f6 

20...Rxd6 21.fxg7+ Ke8 22.exd6 Qd8 23.Rf8+ Black resigned


White has a checkmate in 3. Brutal.

Wednesday, October 25, 2017

Jerome Gambit: Constantly Aware

Sometimes when you play the Jerome Gambit, your opponent equalizes the game. What then? Well, you play along, seeing where the game is going - being constantly aware of opportunities that just might spring up, as in the following game. Thus, the ironic saying: In the Jerome Gambit, when Black has equalized, White has the advantage. ☺

Wall, Bill - Guest477
ICC, 2017

1.e4 e5 2.Nf3 Nc6 3.Bc4 Bc5 4.Bxf7+ 


4...Kxf7 5.Nxe5+ Nxe5 6.d4 Bxd4 7.Qxd4 d6 


8.Qd2

A novelty, according to The Database. What is the White Queen doing on d2? White's dark-squared Bishop will be going to b2.

8...Be6 9.O-O Nf6 10.Nc3 Rf8 11.b3 Kg8 12.Bb2 Rf7 


Black has castled-by-hand and has the advantage of a piece for a pawn. What will he do next?

13.f4 Nc6 14.Rae1 Bd7

Black hopes to move his Bishop out of possible trouble from the "Jerome pawns", but this move allows a center pawn advance - something White needs to be aware of.  

15.e5 dxe5 16.fxe5 Nxe5


Making the best of the situation by returning the piece for a pawn. Even game. This might be considered a good thing by the defender.

17.Rxe5 Bc6 18.Qf4 Qd6 


19.Nb5

On many occasions I have looked askance as Black has harassed White's Queen. Here, it is no big deal, but that kind of evaluation might have had a lulling influence on the defender.

19...Bxb5 20.Rxb5 Qc6 21.c4 Raf8 22.Rf5 Qe6 23.Qd2 


White has a Bishop for a Knight, the tiniest of advantages, but the lineup of Rooks on the f-file hints at an exchange of heavy pieces and a split point.

However, there is something special about the position that both players need to be aware of. (What is the White Queen doing on d2?)

23...Ne4 

Triggering the exchanges, and the draw?

No, actually this leads to a checkmate-in-21, if the game were to go that far.

24.Rxf7 Rxf7 25.Qd8+ Black resigned


Checkmate will arrive shortly.

Monday, October 23, 2017

Jerome Gambit: It's Complicated

Sometimes the Jerome Gambit features a brutal attack on the enemy King. Other times, such as in the following game, it showcases tactical skirmishes all across the board. The notes show several paths for Black where returning a piece is only part of a small plan to fight for play. It is the return of White's Queen from semi-isolation that suddenly changes things.

Wall, Bill - Guest683192
PlayChess.com, 2017

1.e4 e5 2.Nf3 Nc6 3.Bc4 Bc5 4.Bxf7+ 


4...Kxf7 5.Nxe5+ Nxe5 6.d4 Bxd4 7.Qxd4 d6 8.Na3


A novelty, according to The Database. From here the piece figures in a number of lines unplayed, but in the "real" game remains unmoved.

8...Be6 9.O-O Nf6 10.f4 Nc6 11.Qd3 Nb4 


Black harasses the enemy Queen, an idea that sometimes distracts his play. Here, it leads to some Queenside tussling.

12.Qb5 a5 13.e5 Ne4 

Instead, Stockfish 8 suggests a complicated and different campaign, having Black return the sacrificed piece but leaving Black a pawn better: 13...Bd7 14.Qc4+ d5 15.Qb3 Ne4 16.c3 Nc5 17.Qd1 Nbd3 18.f5 Re8 19.e6+ Bxe6 20.fxe6+ Kg8 21.Nc2 Rxe6 22.Be3 Nxb2 23.Qh5 Nbd3 24.Bd4 Qe7 25.Qxd5 c6 26.Qf5 Re2 27.Bxc5 Qxc5+ 28.Nd4 Qxf5 29.Rxf5. Whew!

14.c3 Nd5 

If you contrast Black's three central pieces with White's misplaced Queen, you might prefer the defender in this position. What tilts things slightly toward the attack is the "Jerome pawns".

15.f5 Rf8

Putting his Rook in play, and looking to eventually castle-by-hand, but it does not solve Black's problems. Again, the computer's alternate suggestion is a complicated brawl, starting with returning a piece, and leaving White only a tiny bit better, if at all: 15...dxe5 16.fxe6+ Kxe6 17.Qc4 Nef6 18.Bg5 Kf7 19.Qb3 Qd6 20.Nc4 Qc5+ 21.Kh1 Rhe8 22.Ne3 Kg6 23.Nxd5 Nxd5 24.c4 Nf4 25.Bxf4 exf4 26.Rxf4 h5 27.Raf1 Rf8 28.Qg3+ Kh7 29.Rf7 Rxf7 30.Rxf7 Qd4 31.h3. 

16.Qc4 Nc5 

Giving the piece back now does not work. The difference? White's Queen has taken a step to a more effective square. How odd.

17.fxe6+ Kxe6 18.Qg4+ Ke7 19.Qxg7+ Ke8 20.Rxf8 checkmate