Depending upon your view of lightning chess, the Jerome Gambit may a very good - or very bad - fit for such hectic play.
In the following game, Black's quick-play strategy is to move his pieces, not his pawns. This falls right into White's hands, however.
KingDeath - FoxTerrier
lightning, FICS, 2013
1.e4 e5 2.Nf3 Nc6 3.Bc4 Bc5 4.0-0 Nf6 5.Bxf7+
Transposing to a "modern" variation of the Jerome Gambit - 4.Bxf7+ Kxf7 5.0-0 Nf6
5...Kxf7 6.Nxe5+ Nxe5 7.d4 Bxd4 8.Qxd4 Nc6 9.Qc4+ Kf8
10.Bg5 Qe7 11.Nc3 Qe5 12.f4 Qe8 13.e5 Ng8
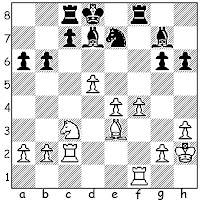
14.Nd5 Qf7 15.Qc5+
Black forfeited on time.
A good exercise is to see how many times a pawn move would have suited Black better than the move he chose. (My guess is at least on moves 9, 10, 11, 13 and 15.)
In this last look at 6.c3 line in the 5...Ke7 defense to the Blackburne Shilling Jerome Gambit (see "Variation on A Theme" and "Long Lines: Seeing Unclearly") we see a game which is mostly about pawns.
As if that were not enough.
Kuskus - omarrafi
blitz, FICS, 2009
1.e4 e5 2.Nf3 Nc6 3.Bc4 Nd4
The Blackburne Shilling Gambit.
4.Bxf7+
The Blackburne Shilling Jerome Gambit.
4...Kxf7 5.Nxe5+ Ke7
6.c3 d6 7.cxd4 dxe5 8.dxe5 Qd3
An alternative mentioned in the previous game.
9.Qe2 Qxe2+ 10.Kxe2
It is not likely that Black was thinking of this position when he played 3...Nd4.
10...Be6 11.d4 c6 12.f4 Rd8 13.Ke3 Ke8 14.Nc3 Bb4 15.f5 Bc4
So far, White's position has largely been playing itself, but now, in the next few moves, Black contributes to the pawns' mobility.
16.Bd2 c5 17.d5 Nh6 18.Kf4 g5+
Apparently not expecting White's next move.
19.Kxg5 Nf7+ 20.Kf4 Bxd5
Giving a piece back for a couple of pawns, but it is not enough.
21.exd5 Bxc3 22.Bxc3 Rxd5 23.e6
This is what Black overlooked
23...Rf8 24.exf7+ Rxf7 25.Rhe1+ Kd7 26.g4 h5 27.h3 Rd3 28.Rad1
Black resigned
White has the extra piece and the extra pawn.
Continuing to look at the 6.c3 line in the 5...Ke7 defense to the Blackburne Shilling Jerome Gambit (see "Variation on A Theme"), here is a game that quickly becomes wildly complicated.
I have used Houdini 3 to try to give some guidance, but the long lines of play it suggests sometimes seem to lead from "unclear" to "unclear". Or, as the old children's song used to go, "Some kind of help is the kind of help we all can do without."
(Still, it is worth playing over the computer's lines, for its cold-blooded, dynamic play.)
paoloumali -manicwild
standard, FICS, 2011
1.e4 e5 2.Nf3 Nc6 3.Bc4 Nd4
The Blackburne Shilling Gambit.
4.Bxf7+
The Blackburne Shilling Jerome Gambit.
4...Kxf7 5.Nxe5+ Ke7
An overlooked line recently reviewed in "Bypassed in Time".
6.c3 d6 7.cxd4
White decides not to withdraw his Knight.
7...dxe5 8.dxe5 Qd4
Black's alternative, 8...Qd3, may be a tiny bit better.
9.Nc3 Ke8 10.Qh5+ g6 11.Qg5 Bc5
The reason behind Black's King's retreat.
Houdini 3 prefers to see the Bishop on the long diagonal: 11...Bg7
12.Qh4 Bxe5 13.O-O h6 14.d3 Qd8 15.Qxd8+ Kxd8 16.d4 Bg7 17.Be3 Ne7 18.d5 Bd7 19.f4 Rf8 20.Rac1 b6 21.h3 Rc8 22.Kh2 a6 23.Rc2
 |
| analysis diagram |
with a small advantage to Black.
However, White has two pawns for his sacrificed piece and Black's King is still trapped in the middle of his first rank, so the position should not be painful for a hardy Jerome Gambiteer.
12.O-O Ne7
Black is developing reasonably, but Houdini 3 again takes issue, saying that this gives White a small advantage, and suggesting 12...Qd3 13.Nd5 Bb6 14.Re1 c6 15.Nxb6 axb6 16.Re3 Qd4 17.d3 Be6 18.a3 Kd7 19.Re2 Kc7 20.Be3 Qd8 21.Qg3 Kb8 22.Rc1 Ra4 23.Rd2 Ne7 24.Qh4 Nc8 25.Qf6 Bb3
 |
| analysis position |
with an even game.
Um, okay.
13.Nb5
Of course, this play is too straight-forward for Houdini 3, which recommends 13.d3 h6 14.Qg3 Qd7 15.Be3 Bb4 16.e6 Qxe6 17.Nb5 Bd6 18.Nxc7+ Bxc7 19.Qxc7 Rh7 20.Rfe1 Rf7 21.d4 Qf6 22.Qc2 g5 23.d5 Kf8 24.Rad1 Kg8 25.Bd4 Qd6 26.Rc1 b6 27.Qc7
 |
| analysis diagram |
with an advantage to White.
Black has castled-by-hand, but his Queenside development (note the typical Bishop on c8 blocking in the Rook on a8) still lags.
13... Qd7 14.a4 b6
A blunder, although it may not be easy to see.
Once again, Houdini 3 comes to the "rescue": 14...Bb6 15.e6 Qxe6 16.a5 h6 17.axb6 hxg5 18.Nxc7+ Kf7 19.Nxe6 Bxe6 20.d4 Bc4
21.Re1 axb6 22.Bxg5 Rhc8 23.d5 Ke8 24.f3 Kd7 25.Rec1 b5 26.Kf2 Ra4 27.Kg3 Ng8 28.Be3 Nf6 29.Rxa4 bxa4 30.Kf4
 |
| analysis diagram |
White's three extra pawns balance Black's extra piece, and perhaps offer a whisper of an advantage.
15.e6
Taking advantage of the unfortunate placement of Black's Royal Family.
15...Qc6
Safer was 15...Qd3 although you've probably had enough of Houdini 3's ideas for the moment.
16.Qf6
This looks strong to me, but Houdini 3 has a conniption fit, preferring, instead 16.d4 Bxe6 17.Qe5 Bd6 18.Qxh8+ Kd7 19.Qxh7 Qxe4 20.Bg5 Re8 21.Rfe1 Qf5 22.Qh4 Nd5 23.Rac1 Qf8 24.Qh7+
Qf7 25.Qxf7+ Bxf7 26.Rxe8 Bxe8 27.Nxa7 Bf7 28.Nc6 Nb4 29.Ne5+ Bxe5 30.dxe5 Bb3 31.Bd2 Nc6
 |
| analysis diagram |
when White is up the exchange and a few pawns.
16...Rf8 17.Qe5
17...Kd8
Missing the defense 17...Bd6 18.Nxd6+ cxd6 19.Qd4 Qc5 20.Qd3 Nc6 21.Ra3 Bxe6 22.Rc3 Nb4 23.Qe2 Qh5 24.Qxh5 gxh5 25.b3 Kd7 26.Ba3 Na6 27.d4 Rac8 28.Rfc1 Rxc3 29.Rxc3 Rg8 30.d5 Bf7 31.Rf3 Be8
 |
| analysis diagram |
with Black for choice, according to Houdini 3 (although I like White's pawns).
18.d4 Bd6 19.Nxd6 cxd6 20.Qg7 Re8 21.d5
Here Black forfeited by disconnection.
In the final diagram, the defender's position is horribly congested, and White is about to add Bg5 to the painful cramp. Among other things, White threatens to win Black's Kingside pawns and advance his 5-0 (!) majority; while the c-file will also beckon to one of his Rooks. Returning a piece with ...Bxe6 will not solve much for Black.
Some of White's play in Jerome Gambit-style positions comes from the exposed position of Black's King. Some of it comes from the useful advance of "Jerome pawns". In the following game, both of these themes play a part.
graniglia - jackb
standard, FICS, 2000
1.e4 e5 2.Nf3 Nc6 3.Bc4 Nd4
The Blackburne Shilling Gambit.
4.Bxf7+
The Blackburne Shilling Jerome Gambit.
4...Kxf7 5.Nxe5+ Ke7
The unusual defense mentioned in "Bypassed in Time". This time White has a stronger response.
6.c3 d6 7.Nc4 Ne6 8.d4 Nf6
White has two pawns for his sacrificed piece, while Black's busy King looks to be in the way of his pieces.
9.O-O Qe8 10.e5 Nd7
It's a simple thing, but by not interpolating 10...dxe5 11.dxe5 Black goes from an even game to a worse one. The open e-file with the royal couple on it spells disaster.
11.exd6+ cxd6 12.d5
12...Qg6
Getting the Queen out of the line of fire. Best, calming down the position, seems to be 12...Nf6 13.dxe6 Bxe6 14.Re1 Kf7 15.Nxd6+ Bxd6 16.Qxd6 Rd8 when Black's King has found cover, leaving him two pawns down.
13.dxe6 Nc5 14.Nxd6
14...Nd3 15.Nxc8+ Rxc8 16.Be3 Black resigned
Black will capture the pawn at e6 (with ...Rc6 and ...Rxe6) but will remain down material, with an uncomfortable King.
(FYI, this is blog post 1,700)


