
dperez22 - drewski02
3 2 blitz, Chess.com, 2021
1.e4 e5 2.Nf3 Nc6 3.Bc4 Bc5 4.Bxf7+

4...Kxf7 5.Nxe5+ Nxe5 6.Qh5+ Ke6

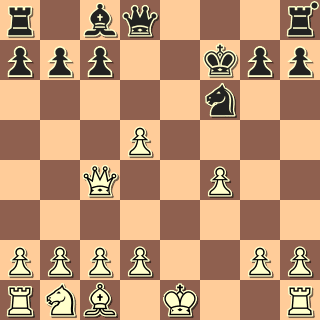
7.f4 Nf6
Attack that Queen! Shouldn't three pieces hold off Her Majesty?
Actually, no. This is the kind of move that can pop up in a blitz game, where the depth of analysis can suffer. The Database has 115 examples.
8.Qxe5+ Kf7 9.Qxc5 d6

Having recaptured sacrificed material, White is ahead by a couple of pawns.
10.Qc4+
There are safer places for the Queen to return to, but you could not tell this from investigating The Database, where the text move has scored 8 - 1.
10...d5
To his credit, drewski02 comes up with a novelty that is probably the strongest response.
11.exd5
Opening up the e-file is dangerous.
11...Nxd5
Missing 11...Re8+ which would turn the game to Black's advantage.
12.Nc3
Targeting the Knight, but much wiser was the discrete 12.O-O.
12...c6
This makes sense, but it would have been useful to fit in 12...Re8+.
13.Nxd5
Again: 13.0-0 was prudent.
13...cxd5 14.Qd4

14...Qh4+
Either this move or 14...Re8+ put White's King under pressure.
15.g3 Rd8
This has to be a mouse slip. With 15...Re8+, Black's attack would build.
16.gxh4
White is up a Queen and a couple of pawns. His only real danger now is the clock.
16...Re8+
Yes - but late.
17.Kf2 Bg4 18.Qxd5+ Be6 19.Qh5+ Kg8 20.Rg1 Rf8 21.Qh6 Rf7
Instead, 21...Rxf4 would just be a flash in the pan.
22.Qxe6 Raf8

Black is tied up. White prepares checkmate.
23.b3 b5 24.Bb2 a5 25.Rxg7+ Kh8 26.Rxf7+ Kg8 27.Rg7+ Kh8 28.Rg8 checkmate


