
My latest set-to shows why strong tactical players might enjoy the opportunities that the Jerome can provide - choosing moves that I don't even dream of, until I am tutored in tactics by Houdini.
perrypawnpusher - tcs
blitz, FICS, 2013
1.e4 e5 2.Nf3 Nc6 3.Bc4 h6
The Semi-Italian Opening.
4.0-0 Nf6 5.Nc3 Bc5 6.Bxf7+

The Semi-Italian Four Knights Jerome Gambit.
6...Kxf7 7.Nxe5+ Nxe5 8.d4

According to The Database, I've had this position 53 times, scoring 80%. Should be familiar.
8...Be7
But this is new.
9.dxe5 Nh7 10.Qf3+ Kg8 11.Be3 Ng5

The Knight returns to battle. After the game, Houdini suggested the more modest castling-by-hand: 11...Nf8 12.Qe2 Ng6 13.f4 Kh7 14.Rad1.
12.Qe2 Kh7 13.f4 Ne6 14.f5 Ng5
15.Rad1
Putting pressure on the d-file (where the Black Queen is) and discouraging a d-pawn move, which would free Black's Bishop and Rook.
After the game, Houdini recommended 15.f6 gxf6 16.Nd5!? with the initiative and an attack based on the White Rook's access to the f-file, White's Queen's infiltration along the d1-h5 diagonal, and the kick h2-h4. If you found 16.Nd5, good for you!
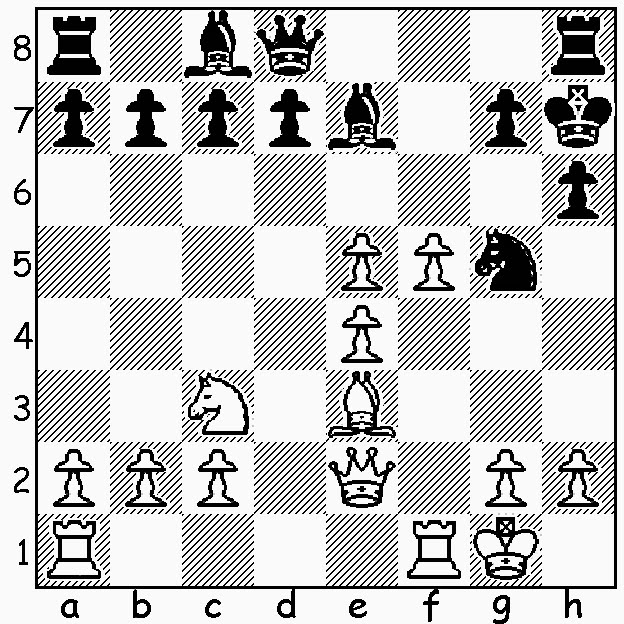
15...Rf8 16.Bd4
Here, again, Houdini preferred 16.Qg4 Qe8 17.h4 Ne6 18.Nd5!? as a way to start a promising attack. I've got no argument with that, now that I see it.
16...Qe8 17.f6 gxf6 18.exf6 Bb4 19.Nd5

Better late than never, I guess.
White's attack is beginning to look menacing, not only because of the advancing "Jerome pawns", but because of the first player's development, contrasted with Black's two Queenside pieces "still in the garage."
Now it's time for Black to cut his losses with 19...Qxe4 20.Qxe4+ Nxe4 21.Nxb4 remaining only a pawn down, albeit with the worse position.
19...Ba5

20.e5
This is a good move, after which White has a decent edge.
However...
After the clearance sacrifice, 20.f7! Houdini argued (with a little help from me after the game) that White had an attack leading to mate:
a) 20...Rxf7 Qd8 21.Nf6+ Kg7 22.Nh5+ Kh7 (22...Kg6 23.Nf4+ Kxf7 24.Qh5+ Ke7 25.Ng6+ Ke6 26.Qg4+ Kd6 27.Bf2+ Kc6 28.Ne5+ Kb5 29.Qe2+ Ka4 30.b3+ Ka3 31.Nc4+ Kb4 32.a3+ Kb5 33.Ne5#) 23.Qd3 Nh3+ 24.Kh1 Qg5 25.Nf6+ Kg6 26.e5+ Kxf7 27.e6+ Ke7 28.Qh7+ Kd6 29.exd7 Rd8 30.Be3+ Bd2 31.Qd3+ Ke6 32.Qc4+ Ke7 33.Qe4+ Kd6 34.Rxd2+ Qd5 35.Rxd5+ Kc6 36.Qc4#;
b) 20...Qxf7 21.Rxf7+ Rxf7 (21...Qxf7 22.Rf1 Qe6 [22...Bb6 23.Rxf7+ Nxf7 24.Nxb6 Ne5 25.Nxa8 d6 26.Bxe5 dxe5 27.Qc4 Kg7 28.Qxc7+ Kf6 29.Qxc8 h5 30.Nc7 b6 31.Qf8+ Kg5 32.Ne6+ Kg4 33.Qf3+ Kh4 34.Qg3#; 22...d6 23.Rxf7+ Nxf7 24.Qf3 Ne5 25.Bxe5 Bb6+ 26.Kh1 Be6 27.Qf6 dxe5 28.Qe7+ Kg6 29.Qxe6+ Kg7 30.Qf6+ Kh7 31.Qf7+ Kh8 32.Ne7 Re8 33.Ng6#; 22...Bc3 23.Rxf7+ Nxf7 24.Bxc3 d6 25.Qh5 Be6 26.Nxc7 Ne5 27.Nxe6 Rg8 28.Qf5+ Kh8 29.Qf6+ Kh7 30.Qe7+ Kh8 31.Qxd6 Rg6 32.Bxe5+ Kh7 33.Nf8+ Kg8 34.Qxg6+ Kxf8 35.Bd6#] 23.Nf6+ Kg7 24.Nxd7+ Kg8 25.Rf8+ Kh7 26.Rh8+ Kg6 27.Nf8+ Kf7 28.Nxe6 Bxe6 29.Qf1+ Ke7 30.Bc5+ Kd7 31.Qb5+ c6 32.Qxb7+ Bc7 33.Rxa8 Nf3+ 34.gxf3 Bxa2 35.Qc8#) 22.Qh5 d6 23.Rf1 Rxf1+ 24.Kxf1 Be6 25.Nf6+ Kg7 26.Ng4+ Kf8 27.Qxh6+ Ke8 28.Nf6+ Kf7 29.Qh5+ Ke7 30.Qxg5 Rf8 31.Kg1 Bb6 32.Nd5+ Kd7 33.Qe7+ Kc6 34.Bxb6 Bxd5 35.Qxc7+ Kb5 36.Bxa7 Rc8 37.Qxc8 Bc6 38.Qc7 Be8 39.Qxd6 Ka5 40.Qc5+ Bb5 41.c4 b6 42.Qxb5#;
That kind of analysis is completely insane, of course, but a strong tactical player would have jumped on 20.f7! on principal, trusting his skill to bring things to the proper conclusion.
How many readers saw 20.f7! ?
20...Bb6
Overlooking something.
21.Bxb6 cxb6 22.Nc7 Black resigned

White's Knight will win the Rook, and then, because of Black's doubled b-pawns and White's pressure on the d-file, there will be time for it to escape!


