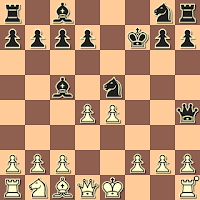
One of the scariest defenses to the Jerome Gambit is what I have called a pie-in-the-face variation. After 1.e4 e5 2.Nf3 Nc6 3.Bc4 Bc5 4.Bxf7+ Kxf7 5.Nxe5+ Nxe5 6.d4 comes 6...Qh4!?, first seen, as far as I can tell, in Sorensen - Anonymous, Denmark, 1888 (see "Jerome Gambit Tournament: Chapter X").
By the way, I do not think that Alonzo Wheeler Jerome ever faced 6...Qh4, or covered it in his published analysis.
The following game shows the power of the counter-attack, as well as at least one of its weaknesses. After all, Bill Wall is playing White; and, for the record, he has faced 6...Qh4 34 times, scoring 87%.
Wall, Bill - Guest8885375
PlayChess.com, 2018
1.e4 e5 2.Nf3 Nc6 3.Bc4 Bc5 4.Bxf7+
4...Kxf7 5.Nxe5+ Nxe5 6.d4
This was originally A.W. Jerome's choice, although he later moved on to 6.Qh5+.
6...Qh4
Here we go. White has sacrificed, but Black attacks.
7.O-O Ng4 8.h3 d6
Black's light-squared Bishop now hungrily eyes g4 and h3. How sad to see that Komodo 9 (welcome to the analysis team) sees the game as even.
9.dxc5 N8f6
More development! White isn't the only player who can sacrifice a piece.
10.hxg4 Nxg4 11.Bf4
White's Bishop arrives in time to protect h2.
The computer now suggests that Black retreat his Knight, and after 11...Nf6 12.Bg3 Qxe4 13.cxd6 cxd6 14.Qxd6 things have settled down, and White has an extra pawn. But why should Black's Knight retreat?
11...Rf8 12.cxd6 Kg8 13.Qd5+
Oh, okay, I get it: 11...Nf6 would have prevented this check.
13...Kh8 14.dxc7 Rxf4
Overlooking White's snappy response.
15.Qd8+ Black resigned
I suspect in his analysis Black saw that the d8 square was covered by his Queen, and so White's check would be harmless, but he missed the fact (in his chess vision?) that White's Queen would be protected by the pawn at c7, waiting for its chance to promote, i.e. 15...Qxd8 16.cxd8/Q+, with mate to follow.


No comments:
Post a Comment