I sometimes learn while I am playing the Jerome Gambit, but I usually learn a lot afterward, when I review the game. My latest set-to shows why strong tactical players might enjoy the opportunities that the Jerome can provide - choosing moves that I don't even dream of, until I am tutored in tactics by Houdini. perrypawnpusher - tcs blitz, FICS, 2013 1.e4 e5 2.Nf3 Nc6 3.Bc4 h6 The Semi-Italian Opening. 4.0-0 Nf6 5.Nc3 Bc5 6.Bxf7+
The Semi-Italian Four Knights Jerome Gambit. 6...Kxf7 7.Nxe5+ Nxe5 8.d4
According to The Database, I've had this position 53 times, scoring 80%. Should be familiar. 8...Be7 But this is new. 9.dxe5 Nh7 10.Qf3+ Kg8 11.Be3 Ng5
The Knight returns to battle. After the game, Houdini suggested the more modest castling-by-hand: 11...Nf8 12.Qe2 Ng6 13.f4 Kh7 14.Rad1. 12.Qe2 Kh7 13.f4 Ne6 14.f5 Ng5
15.Rad1 Putting pressure on the d-file (where the Black Queen is) and discouraging a d-pawn move, which would free Black's Bishop and Rook. After the game, Houdini recommended 15.f6 gxf6 16.Nd5!? with the initiative and an attack based on the White Rook's access to the f-file, White's Queen's infiltration along the d1-h5 diagonal, and the kick h2-h4. If you found 16.Nd5, good for you! 15...Rf8 16.Bd4 Here, again, Houdini preferred 16.Qg4 Qe8 17.h4 Ne6 18.Nd5!? as a way to start a promising attack. I've got no argument with that, now that I see it. 16...Qe8 17.f6 gxf6 18.exf6 Bb419.Nd5
Better late than never, I guess. White's attack is beginning to look menacing, not only because of the advancing "Jerome pawns", but because of the first player's development, contrasted with Black's two Queenside pieces "still in the garage." Now it's time for Black to cut his losses with 19...Qxe4 20.Qxe4+ Nxe4 21.Nxb4 remaining only a pawn down, albeit with the worse position. 19...Ba5
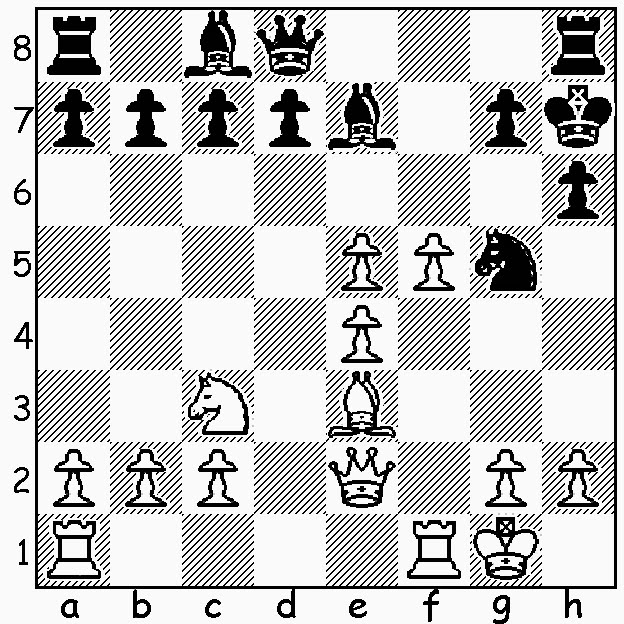
20.e5 This is a good move, after which White has a decent edge. However... After the clearance sacrifice, 20.f7! Houdini argued (with a little help from me after the game) that White had an attack leading to mate: a) 20...Rxf7 Qd8 21.Nf6+ Kg7 22.Nh5+ Kh7(22...Kg6 23.Nf4+ Kxf7 24.Qh5+ Ke7 25.Ng6+ Ke6 26.Qg4+ Kd6 27.Bf2+ Kc6 28.Ne5+ Kb5 29.Qe2+ Ka4 30.b3+ Ka3 31.Nc4+ Kb4 32.a3+ Kb5 33.Ne5#) 23.Qd3 Nh3+ 24.Kh1 Qg5 25.Nf6+ Kg6 26.e5+ Kxf7 27.e6+ Ke7 28.Qh7+ Kd6 29.exd7 Rd8 30.Be3+ Bd2 31.Qd3+ Ke6 32.Qc4+ Ke7 33.Qe4+ Kd6 34.Rxd2+ Qd5 35.Rxd5+ Kc6 36.Qc4#; b) 20...Qxf7 21.Rxf7+ Rxf7 (21...Qxf7 22.Rf1 Qe6 [22...Bb6 23.Rxf7+ Nxf7 24.Nxb6 Ne5 25.Nxa8 d6 26.Bxe5 dxe5 27.Qc4 Kg7 28.Qxc7+ Kf6 29.Qxc8 h5 30.Nc7 b6 31.Qf8+ Kg5 32.Ne6+ Kg4 33.Qf3+ Kh4 34.Qg3#; 22...d6 23.Rxf7+ Nxf7 24.Qf3 Ne5 25.Bxe5 Bb6+ 26.Kh1 Be6 27.Qf6 dxe5 28.Qe7+ Kg6 29.Qxe6+ Kg7 30.Qf6+ Kh7 31.Qf7+ Kh8 32.Ne7 Re8 33.Ng6#; 22...Bc3 23.Rxf7+ Nxf7 24.Bxc3 d6 25.Qh5 Be6 26.Nxc7 Ne5 27.Nxe6 Rg8 28.Qf5+ Kh8 29.Qf6+ Kh7 30.Qe7+ Kh8 31.Qxd6 Rg6 32.Bxe5+ Kh7 33.Nf8+ Kg8 34.Qxg6+ Kxf8 35.Bd6#] 23.Nf6+ Kg7 24.Nxd7+ Kg8 25.Rf8+ Kh7 26.Rh8+ Kg6 27.Nf8+ Kf7 28.Nxe6 Bxe6 29.Qf1+ Ke7 30.Bc5+ Kd7 31.Qb5+ c6 32.Qxb7+ Bc7 33.Rxa8 Nf3+ 34.gxf3 Bxa2 35.Qc8#) 22.Qh5 d6 23.Rf1 Rxf1+ 24.Kxf1 Be6 25.Nf6+ Kg7 26.Ng4+ Kf8 27.Qxh6+ Ke8 28.Nf6+ Kf7 29.Qh5+ Ke7 30.Qxg5 Rf8 31.Kg1 Bb6 32.Nd5+ Kd7 33.Qe7+ Kc6 34.Bxb6 Bxd5 35.Qxc7+ Kb5 36.Bxa7 Rc8 37.Qxc8 Bc6 38.Qc7 Be8 39.Qxd6 Ka5 40.Qc5+ Bb5 41.c4 b6 42.Qxb5#; That kind of analysis is completely insane, of course, but a strong tactical player would have jumped on 20.f7! on principal, trusting his skill to bring things to the proper conclusion. How many readers saw 20.f7! ? 20...Bb6 Overlooking something. 21.Bxb6 cxb6 22.Nc7 Black resigned
White's Knight will win the Rook, and then, because of Black's doubled b-pawns and White's pressure on the d-file, there will be time for it to escape!
Once your opponent has played a move, it is always a good idea to ask yourself "Why did he play that?" Often the reason is obvious; sometimes, not. HauntedKnight - amedved, blitz, FICS, 2013 1.e4 e5 2.Nf3 Nc6 3.Bc4 Bc5 4.Bxf7+
4...Kxf7 5.Nxe5+ Nxe5 6.d4 Bxd4 7.Qxd4 Qf6
Why did he play that move? Clue Number 1: White played 8.Qd1 in both Jerome,A - Norton,D, unfinished correspondence game, 1876 andJerome,A - Jaeger,D, correspondence, 1879 (1-0, 35). Clue Number 2: HauntedKnight, himself, played 8.Qd5+ twice in 2011, once in 2012, and four times in 2013. 8.Nc3 The Database has only two examples of this move, and in both games Black responded with 8...Ne7. Amedved has an improvement. 8...Nf3+ Oh. White resigned. His Queen is lost.
After the previous game, I was pleased to come across the following Italian Four Knights Jerome Gambit.
JMonson has played the Jerome Gambit at FICS for at least 5 years (scoring 58%). Here he runs afoul of a relatively rare counter-attacking idea. The whole line deserves further exploration. JMonson - fischerJrSON standard, FICS, 2013 1.e4 e5 2.Nf3 Nc6 3.Bc4 Nf6 4.Nc3 Bc5 5.Bxf7+
The Italian Four Knights Jerome Gambit. 5...Kxf7 6.Nxe5+ Nxe5 7.d4 Nfg4
A plucky move by Black - Let White choose which piece he wants to capture, I want to attack!
The Database has only 3 earlier examples: two wins for White and one draw, a misleading result. 8.dxc5
Here, Black lost on time in Apterygidae - Danialian, standard, FICS, 2011. There is not much to learn from that.
Houdini prefers 8.f3 for White, leaving Black with an edge after 8...Bxd4 9.Qxd4 Qh4+ 10.Kd2 Qf6 11.Ke2 d6 12.Nd5 c5 13.Nxf6 cxd4 14.Nxg4 Bxg4 15.fxg4 Rac8. Jerome Gambiteers might want to remember 8.f3. 8...Qh4
Instead, 8...c6 was played in the up-and-down MyGameUMove - SoftBrutal, FICS, 2013:9.O-O Re8 10.Nd5 b6 11.b4 bxc5 12.bxc5 Nf6 13.Nxf6 Qxf6 14.Qh5+ g6 15.Qxh7+ Ke6 16.Qh3+ Ke7 17.Qg3 Ba6 18.Bg5 Bxf1 19.Bxf6+ Kxf6 20.Kxf1 a5 21.f4 Nc4 22.Qg5+ Kg7 23.f5 Kf8 24.Qxg6 Rxe4 25.Qh6+ Kf7 26.Qg6+ Ke7 27.Qg7+ Kd8 28.Qg8+ Re8 29.Qg5+ Kc7 30.f6 Re5 31.Qg3 Nd2+ 32.Kg1 d6 33.Rd1 Rae8 34.cxd6+ Kxd6 35.Rxd2+ Kc7 36.Re2 Kd6 37.Rxe5 Rxe5 38.f7 Ke7 39.Qxe5+ Kxf7 40.Qd6 c5 41.Qc6 c4 42.Qc5 a4 43.Qxc4+ Kf6 44.Qxa4 Kf5 45.c4 Ke4 46.c5+ Kd3 47.c6 Ke3 48.c7 Ke2 when White ran out of time and Black had no material to mate, giving a draw. Many improvements are possible for both sides. 9.Be3
This just loses a piece.
Instead 9.Qd5+ Ke7 10.g3 (10.Qd4 Kf7 11.Bf4 is about equal) 10...c6 (10...Qf6 11.f4 Nf3+ 12.Kf1 Qd4 13.Qxd4 Nxd4 14.Nd5+ Kf7 Black would have an edge) 11.Qd6+ Kd8 12.gxh4 Nf3+ 13.Ke2 Re8 14.Kxf3 h5 15.Bg5+ Re7 16.Bxe7+ (16.Qxe7+ Kc7 17.Qd6#) 16...Ke8 17.e5 b6 18.Ne4 Ba6 19.Rad1 Rd8 Black resigned, in stretto - shutrick, FICS, 2007. 9...Nxe3 White resigned
Many players question the value of the Jerome Gambit. Their task is to play one of the refutations, follow through, and claim the point. One risk, however, is that of being so dismissive of the attack that the defender becomes inaccurate in his play. Again, observe the motto: In the Jerome Gambit, Black wins by force, White wins by farce.
After the game, Houdini recommended 11.Qxd6 cxd6 12.Nb5. I wasn't ready to trade Queens. 11...Bg4
Instead, 11...Be6 was seen in perrypawnpusher - hklett, blitz, FICS, 2013 (1-0, 31) while 11...Neg4 was Houdini's post-game recommendation. (Often, harassing White's Queen with a Knight proves to be a time-waster, but not in this case.)
12.f3 Bh5 13.Bf4 Qe6 14.Qf2 c6 15.g4
Objectively, not the best move, but I was pretty sure that my opponent liked his 2-piece advantage on the Kingside, and would figure that he had an extra piece to invest in an attack - if he were properly provoked. 15...Nfxg4?!
Ah, so many of us can resist anything but temptation. The boring 15...Bf7! was probably better, keeping Black's advantage. 16.fxg4 Nxg4 17.Qh4 Bg6 18.Rae1 Rad8 19.h3 Nf6 20.Bg5 Rd4
Despite Black's huffing and puffing, the game is even - which is not the expected outcome of the sacrifice.
Worse, it is time to recall the ironic aphorism inspired by many of Bill Wall's games: Often in the Jerome Gambit, when the game is equal, White is better. In this case, Black has invested (and continues to invest) too much time in his calculations, and his clock soon will become an issue. 21.Bxf6 gxf6 22.Rxf6 Qe5 23.Rf4 Rd2 24.Rf2 Qd4 25.Kg2 Rxf2+ 26.Qxf2 Qxf2+ 27.Kxf2 Kf7 28.Ke3 Ke6 29.Rd1 Ke5
White's extra pawn doesn't give him much more than a slight edge, but time is now on his side.
30.Rd7 Rb8 31.a4 a6 32.a5 b5 33.axb6
Better was33.Ra7
33...Rxb6 34.b3 Rb5
A time-pressure mistake that I missed. I wonder how much precious time my opponent spent trying to figure out why I didn't simply capture the Rook. 35.Rd4 Rc5 36.Rd3 a537.Na4
Almost coming to Black's rescue by dropping material - my clock was ticking too. After the game Houdini suggested the patient 37.h4 Ke6 38.Kd4 Rh5 39.Rh3 Kd6 40.Ne2.
37...Rxc2 38.Nb6
Another error.
Here, Black is better, and can now win a pawn with 38...Bxe4, but, unfortunately, he forfeited on time.
In the following game Bill Wall changes up his Jerome Gambit attack, playing 6.d4, the favorite move, at first, of Alonzo Wheeler Jerome. Can his opponent follow him through the maze?
The more straight-forward 6...Bxd4 was seen in Wall,B - berserkergang, FICS, 2011 (1-0, 21) and Wall,B - Guest903719, PlayChess.com, 2013 (1-0, 47), as well as the seminal Jerome,A - Shinkman,W, 1876, (½-½, 42).
Black would do better to follow through on his plan to castle-by-hand: 9...Kg8 10.f4 Nf7. The problem seems to be that he is trying to do too many good things at once - play ...Qf6, safeguard his King, hit back in the center with ...d5. 10.f4 N5g6 11.Be3 d5?12.cxd6 Ng8
The "Jerome Pawns" are a scary sight. 13.d7Rd8 A bit better (but not much) was 13...Bxd7 14.Qxd7+ N6e7. 14.dxc8/Q Raxc8 15.Qh5
Threatening 16.f5. White is up two pawns, with the initiative. 15...Kf8 16.e5 Qf7 17.f5 Nxe5 18.Bc5+ Ne7 19.Qxh7 Qf6 20.Ne4 Qh6 21.Qxh6 gxh6 22.f6 Black resigned
No matter how he struggles, Black is going to lose a piece and a Rook. Amazing.
The game Pete Banks ("blackburne") referred to in the last post packs a lot of interesting chess in less than a dozen moves. It blew my mind. Clark (Halesowen),M - Lloyd (Greenlands),J Worcester County League D2, 2013 1.e4 e5 2.Nf3 d6 3.Bc4 Bd7 A bit unusual for a Philidor Defense. When I first saw it I figured that Black was planning on answering 4.d4 with 4...exd4 and then 5...Nc6. 4.d4 b5
This is Black's idea, quite unexpected. Now Houdini, analyzing, goes to town, showing White working over the Queenside and then winning a pawn: 5.Bd5 c6 6.Bb3 exd4 7.Qxd4 Na6 8.a4 Nc5 9.axb5 Nxb3 10.cxb3 cxb5 11.0-0 Nf6 12.Bf4 Be7 13.Bxd6. 5.Bxf7+ I am not going to call this a "Jerome" anything - but I like the move. The meanest thing Houdini has to say about it is that it leads to an even game. 5...Kxf7 Of course, Black has to take the sacrifice, as the oppositional 5...Ke7 is met by 6.Bxg8 h6 7.dxe5 Rxg8 8.Qd5. 6.Ng5+
This has the feel of an ad hoc attack, but there are some interesting aspects to the position, starting with the fact that Black is still weak on the light squares, even after White has sacrificed his light-squared Bishop. 6...Ke8 7.dxe5 dxe5 Played too quickly. Houdini suggests 7...Qe7 8.Nc3 c6 (8...Qxe5 9.Nd5 Na6 10.f4) 9.exd6 Qxd6 10.Qe2 h6 = (10...Qg6 11.f4) 11.Nf3 Bg4 12.0-0 Qg6 13.Re1 Qh5 14.e5 Ne7 15.Bf4 Kf7 =. 8.Qd5 Qe7 9.Qxa8 Qb4+ 10.c3 Black resigned.
I will have to keep my eyes open to see if 4...b5 ever shows its face in the Worcester County League again.
In a comment to "Curse You, Red Baron!" Pete Banks ("blackburne") wrote Hi Rick, you seem to class anything with an early Bxf7 as some kind of Jerome these days. A member of my club recently won an OTB game in 10 moves after saccing on move 5. I would class it as a Philidor, but if you're interested, it's here: http://www.halesowenchessclub.org.uk/mcvjl.htm
My response - Hi Pete, Thanks for the game reference. I'll share the line with Readers in a few posts. (I'm always disappointed when my opponent plays 2...d6.) I've expanded coverage in this blog from Jerome Gambit games to Jerome-like, Jerome-ish, and Jerome-inspired lines, as many of those who play the "standard" Jerome also like to toss in Bxf7+ elsewhere. Best wishes, Rick