
Picking up the action in perrypawnpusher - KenWhitaker, blitz 6 12, FICS, 2010:

17...b6
KenWhitaker had a wild idea that he wanted to add to my misery.
18.Bxh6

This is the move that I had been dreaming up. It doesn't save White, but it complicates things enough to allow for an escape.
18...Ba6

Winning the exchange.
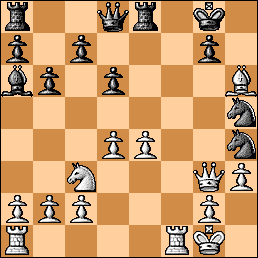
Still, Black should have stayed with the program: 18...gxh6 19.Qg3+ Ng4 20.hxg4 Bb7 21.Qd3 Qg5 22.g3 Ng6 when White's two extra pawns do not balance out Black's extra piece.

analysis diagram
19.Qg3

There is no time to save the Rook on f1 – and no need.
19...Nh5
Black's other defensive try was 19...Qe7. White can scramble to keep things busy: 20.Rf2 Nh7 21.Nd5 Qd7 22.Qxh4 gxh6 23.Rf6 and White is holding his own in the mess.

analysis diagram
20.Qg4 Bxf1 21.Rxf1

I imagine about now my opponent was thinking, even as his clock ticked on: What does a defender have to do to win this game?? White is down a Rook! What are my Knights doing over there? Can't I get rid of that annoying Bishop?
21...Re6

Oh, no!!
A Rook move was the right idea, but not that one.
After 21...Rf8 22.Rxf8+ Qxf8 23.Qxh4 Qf6 24.Qxf6 Nxf6 25.Bg5 White's Knight and two pawns would be a match for Black's Rook.

analysis diagram
22.Qxe6+

22...Kh7 23.Be3 Nf6 24.Bg5 Ng6 25.Bxf6 gxf6

White's advantage is much greater than a few pawns.
26.Rxf6 Nf8
The final let down.
27.Qf7+ Black resigned

Who was it that said "Good luck is better than a license to steal"?
No comments:
Post a Comment