1.e4 e5 2.Nf3 Nc6 3.Bc4 Bc5 4.Bxf7+ ...and related lines
(risky/nonrisky lines, tactics & psychology for fast, exciting play)
Sunday, October 13, 2013
Trampled!
Although I reached a decent position out of the opening in the following game, it felt like I was suddenly trampled by my opponent. Only later, after I was able to examine the game in more detail, did I see how I let various opportunities (some easy to see, some not) slip by - giving Black the signal to run me over.
perrypawnpusher - avgur
blitz, FICS, 2013
1.e4 e5 2.Nf3 Nc6 3.Bc4 Bc5 4.Bxf7+
4...Kxf7 5.Nxe5+ Nxe5 6.Qh5+ Ng6
7.Qd5+ Ke8 8.Qxc5 d6 9.Qe3 Nf6 10.0-0 Kf7 11.f4 Rf8
Alternately, 11...Re8 was seen in perrypawnpusher - whitepandora, blitz, FICS, 2011 (1-0, 64).
12.f5 Ne5 13.d4 Neg4
The more sedate 13...Nc6 was probably better. Black's choice in the game allows White to even things up, or even get a small edge. It is hard for Black's Knights to avoid the temptation of harassing the White Queen, however.
14.Qb3+
An improvement over 14.Qf4 from perrypawnpusher - Jore, FICS, 2010 (1-0,32).
14...d5
15.e5
Stronger, according to Houdini, who advised me after the game, is 15.h3 Nh6 16.Bxh6 gxh6.
15...Ne4 16.h3
Already looking several moves ahead - but wrongly so.
In retrospect, Houdini preferred 16.Qh3 Nh6 17.Bxh6 gxh6 18.e6+ Kg8 19.Nc3 Nxc3 20.bxc3 Qg5 21.Rae1
analysis diagram
when White's "Jerome pawns" are poised to create trouble (and might encourage Black to return a piece with ...Bxe6).
16...Ngf2 17.Rxf2
Too hurried. Instead, 17.Be3 seems to force 17...Nxh3+, when 18.gxh3 Ng3 19.Rf3 Nxf5 20.Nc3 Be6 would be an equal game.
Where did my move come from? Well, with Black's Rook on e8 instead of f8, the position is the same as in the above game, perrypawnpusher - whitepandora, blitz, FICS, 2011, where I won two Knights for my Rook. Humorously, when I posted that game on this blog, I rejected 17.Be3 because of 17...Nh1!?, when 18.Kxh1 Ng3+ would have led to the same two-pieces-for-one-Rook swap.
It turns out that things are not that "simple". After the current game Houdini suggested that White meet 17.Be3 Nh1 with 18.Nc3!? when 18...Nxc3 19.bxc3 Ng3 20.Rf3 Nxf5 21.g4 Kg8 22.Raf1 g6 (not 22...Nh6? 23.Qxd5+!) 23.gxf5 Rxf5 24.c4!?
analysis diagram
gives White a chance for a small edge.
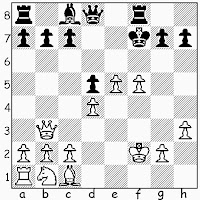
17...Nxf2 18.Kxf2
I was, quite frankly, pleased to have remembered my earlier play in a similar position. It did not hit me for a few moves that I had gotten myself into trouble.
18...Bxf5
Obvious, but look at 18...Qh4+!? This allows Black to snipe the White d-pawn first, e.g. 19.Kf1 Qxd4 20.Nc3 Bxf5 21.Qxd5+ Qxd5 22.Nxd5 Bxc2 and White has nothing for the lost exchange except a weak e-pawn.
19.Kg1
I needed to try something like 19.Kg3!?
19...Kg8
If, instead, 19...Qh4, it looks like I could hold things together with 20.Qxd5+ Be6 21.Qf3+ Kg8 22.Qe3 - but not after 22...Rf5!? followed by 23...Raf8.
20.Nd2 Qh4 21.Nf3 Qg3
22.Kh1
White needed to try 22.B/Nd2 - and pray.
22...Bxh3 23.gxh3 Rxf3 24.Qxd5+ Kh8 25.Bf4 Rxf4 26.Qg2 Qxg2+ 27.Kxg2 Raf8 White resigned
Excellent break-through and wrap-up by my opponent.
Labels:
avgur,
FICS,
Houdini,
Jerome Gambit,
Jore,
perrypawnpusher,
whitepandora
Subscribe to:
Post Comments (Atom)


No comments:
Post a Comment