Sometimes the Jerome Gambit results in a tactical explosion that clearly wins the game. Other times, as in the following encounter, it leads to positions where an observer might muse "Sure, okay, but that's just a little thing, right, how can it lead to a loss?" The little things add up. Wall, Bill - Guest7121133 PlayChess.com, 2020 1.e4 e5 2.Nf3 Nc6 3.Bc4 Bc5 4.Bxf7+
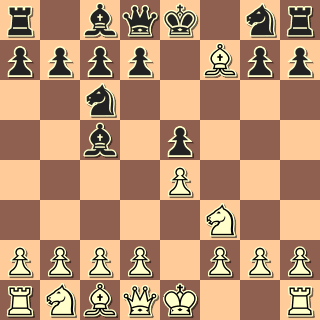
Bill is 8 - 0 from this standard position, which goes back at least as far as Charlick - Mann, corresponcence, Australia, 1881(1-0, 72). The Database has 196 games with this position, with White scoring 71%. 10.d4 Rf8 11.O-O Rf7 It probably would have been more prudent for Black to have castled-by-hand with 11...Kf7 and 12...Kg8. 12.Nc3 Bd7 13.f4 Ng4
After White's Queen has made so many early moves - Qh5, Qd5, Qxc5, Qe3 - it might seem logical to "punish" her for those misdeeds; but, by wasting a tempo here and there, Black seems to actually reward such sallying. 14.Qe2 a6 This looks like a waste of time. It is enjoyable to see the recommendation of Komodo 10 (26 ply): 14...Qf6 15.Qd3 Qh4 16.h3 Nf6 17.f5 Ne7 18.Bd2 Kf8 19.Rf4 Qg5 20.Rf2 Qh4 21.Rf4, etc, draw. I have pointed out before that computer engines seem to think so little of White's play in the Jerome Gambit that they grab a chance for the first player to force a draw by repetition, salvaging a half point, whenever possible. I doubt that Bill would have gone along with such a plan. 15.f5 Qh4 16.h3
The Knight must retreat, and Black must surrender a piece. He would do it best with the straight forward 16...Nf6 17.fxg6 hxg6, with advantage to White. 16...Nh6 This gives White too much along the f-file. 17.fxg6 Rxf1+ 18.Qxf1 b5 19.Bxh6 Black resigned
In the following Jerome Gambit game, Black's Knights gallop all over the Kingside, without accomplishing much, which all seems a bit surprising, until the end, when White's tactics win the day. Wall, Bill - Guest3615175 PlayChess.org, 2019 1.e4 e5 2.Nf3 Nc6 3.Bc4 Bc5 4.Bxf7+
This is one of those positions where Black does better with a Knight of f6. Still, he maintains an edge with the text. 10.Nc3 N8e7 11.d4 Nh4
Aggressive looking, true, but I think it doesn't accomplish much. 12.Qg3 Neg6 Protecting the advanced Knight a second time, but overlooking White's effective response. 13.Bg5Nxg2+ Surrendering a Knight. 14.Qxg2 Nf4 15.Qg3 Black resigned
Best for Black now is 15...Nh5 16.Bxf6 Nxg3 17.hxg3 gxf6, when White will win a second pawn with 18.Nd5, in a position where the first player has a material advantage, better development and better pawn structure.
The following game features an early slip by Black which surrenders his advantage. It is instructive, however, to see how White builds his attack, culminating in checkmate. Wall, Bill - Guest6179121 PlayChess.com, 2019 1.e4 e5 2.Nf3 Nc6 3.Bc4 Bc5 4.Bxf7+
4...Kxf7 5.Nxe5+ Nxe5 6.Qh5+ Ke6 7.f4 Nf6
Black is unfamiliar with the Jerome Gambit. In addition, my guess is that this is a blitz game, and that Black did a rapid "calculation" - I have 3 pieces developed to 1 of his, and I attack his Queen! 8.Qxe5+ Kf7 9.Qxc5 d6 10.Qb5 a6
The loss of a tempo increases the danger. 11.Qb3+ Raising the question (which takes time to answer) - can White afford to grab the b-pawn after 11...Be6? It is likely not worth the effort: 11...Be6 12.Qxb7 Qd7 13.Qb4 c5 14.Qa3 Nxe4. Still, Black declines to make the offer. 11...Kf8 12.e5 dxe5 13.fxe5 Nd5 14.O-O+ Ke8
15.Nc3 c6 Black does not fall for 15...Nxc3 16.Qf7# 16.Ne4 Rf8 17.Nd6+ Kd7 18.Rxf8 Qxf8
In the following game, Black's initial moves give him good play. He relaxes too soon, however, and finds danger along the f-file - twice. Wall, Bill - Guest2056949 PlayChess.com, 2019 1.e4 e5 2.Nf3 Nc6 3.Bc4 Bc5 4.Bxf7+
4...Kxf7 5.Nxe5+ Nxe5 6.d4
6...Bxd4 7.Qxd4 Qf6 8.Be3 Ng4
Give Black extra points for creativity. There is only one other game in The Database with this move - a blitz win for the second player. 9.Qb4 Nxe3 10.fxe3 Stockfish 10 sees Black with a winning game. 10...d6
Ooops. Won games don't win themselves. Perhaps the game should have continued 10...Qh4+ 11.g3 Qe7 12.O-O+ Nf6, still good for Black. 11.Rf1 Qxf1+ 12.Kxf1 Nf6 13.Qc4+ Be6 14.Qxc7+ Kg6 15.Qxd6 Rae8
White has a Queen and 3 pawns for a Rook and a Bishop. He can work up an attack on the enemy King, or continue to pick off material. 16.Nc3 Rhf8 17.Kg1 Ng4 18.Nd5 Kf7 19.Rf1+ Nf6 20.e5 Black resigned
When a defender loses to the Jerome Gambit, it usually happens one of two ways. White either falls upon him like a ton of bricks, or Black defends effectively - until something happens. Sometimes the slip the second player makes seems small, but the punishment can still be harsh. In the following game, the lines in the notes may appear complicated, but they are the kind that an attacker can enter, knowing that, in the end, he will prevail. Wall, Bill - Guest2038506 PlayChess.com, 2019 1.e4 e5 2.Nf3 Nc6 3.Bc4 Bc5 4.Bxf7+
4...Kxf7 5.Nxe5+ Nxe5 6.d4 Bxd4 7.Qxd4 d6
Black has defended well and has a piece for a pawn. He would do well to take care of his King, castling-by-hand. 8.O-O Nf6 9.Nc3 Re8 The defender continues in his task. It might be relevant to note, however, that Bill has reached this position 15 times, and has scored 13 - 1 - 1. It is a familiar hunting ground. 10.Bg5 h6
11.Bh4 g5 12.Bg3 Nh5
According to The Database, this move is a novelty. Black casually goes about exchanging a Knight for a Bishop. 13.f4 White strikes with what he has. Things are going to get messy. 13...Nc6 14.fxg5+ Kg6 15.Qd3 Nxg3
Black continues according to his plan, unaware that the situation has changed. 16.Rf6+ Kg7 The first shock is that the pawn at g5 cannot be captured, as it would lead, inexorably to checkmate:16...Kxg5 17.Qxg3+ Kxf6 18.Nd5+ Kf7 19.Rf1+ Bf5
20.Rxf5+ Ke6 21.Qg4 Qh4 22.Nxc7+ Ke7 23.Nd5+ Kd8 24.Qxh4+ Kd7 25.Rf7+ Re7
26.Rxe7+ Nxe7 27.Qxe7+ Kc6 28.Qc7+ Kb5 29.c4+ Ka4 30.Qd7+ b5 31.Qxb5# White does not have to know the exact sequence; he can find his way down the path, move-by-move. The second shock is that Black's best defense requires him to sacrfice his Queen immediately: 16...Qxf6 17.gxf6 Nh5 (Black has a Rook, a Bishop and a Knight for a Queen and 2 pawns, but his position is very difficult) 18.Nd5 Ne5 19.Qd4 Bd7
20.Nxc7 Nxf6 21.Qxd6 Rac8 22.Rf1 Rxc7 23.Qxc7 Black still has 3 pieces for his Queen, but White should be able to out-play him. 17.Qxg3 Ne5 18.Nd5
18...c6 Black's best defense was complicated and still inadequate:18...Bg4 19.Qh4 h5 20.h3 Be6 21.Nf4 (21.Qxh5
Rh8) 21...Bf7 22.g6 Bxg6 (22...Qxf6 23.Nxh5+) 23.Qg5 Kh7 24.Nxg6
Qxf6 25.Qxf6 Nxg6 26.Qf7+ Kh6 27.Qxc7 Re7 28.Qxd6 Rf8 29.Re1 Black's Rook and Knight can not stop White's Queen from nabbing pawns and prevailing. 19.gxh6+ Black resigned
The following game is chock full of Jerome Gambit moves and themes. It is an enjoyable argument for adding that "refuted" opening to your repertoire, if only for light entertainment. Wall, Bill - Guest2047860 PlayChess.com, 2019 1.e4 e5 2.Nf3 Nc6 3.Bc4 Bc5 4.Bxf7+
4...Kxf7 5.Nxe5+ Nxe5 6.d4
What to do about the pawn fork? The simplest idea is 6...Bxd4, giving back a piece for a pawn. Black opts for something a bit more complicated. 6...Bb4+ 7.c3 Now, what? Well, The Database suggests 7...Qh4!?, which has 13 wins for Black, against 2 losses, although it is fair to point out that those 2 wins for White were by Bill Wall. Or, the Knight can retreat with either 7...Nb6 or 7...Nc6, giving up the Bishop. Or the Bishop can retreat with 7...Be7, giving up the Knight. With an imaginary smile on its face, Stockfish 10 suggests that even 7...Bc5 leads to Black's advantage. 7...Bxc3+ Giving up the piece for a pawn, after all, leading to a position where he has an edge. 8.Nxc3
8...Ng6 9.O-O c6 Black senses that Winter is coming, and takes early steps to limit White's developing pawn center. It is interesting to note that The Database has no examples of either 9...d5 or 9...h5, Stockfish 10's recommendations. Maybe, I should give the alternative title of "Jerome Gambit Secrets #11" to today's post? Jerome Gambit theory continues to expand and evolve. You, too, can add to it. 10.f4 d6
White goes through his checklist: pawn center, Rook on f-file, enemy King on f-file, actual enemy piece to kick with a pawn, possible pawn break in the center... 11.f5 N6e7 12.Bg5
Another thematic Jerome Gambit move, although it is usually aimed at a Knight at f6, not e7. In fact, Komodo 10 now suggests that Black "remedy" this situation with 12...Nf6, with an even game. 12...h6 It is natural to challenge a pin immediately, but, in this case, this is a mistake - encouraging another thematic Jerome Gambit move. 13.Qh5+ Kf8 14.f6
The hits just keep on coming. 14...g6 Leading to a delightful ending, but the stronger defense, 14...Nxf6, falls to 15.Bxf6, and White's heavy pieces will win the day. 15.fxe7+ Ke8 16.exd8=Q checkmate
Here is another (see "Jerome Gambit: Full-Bodied Defense") Jerome Gambit game which should be routine and boring. Black makes a mistake on move 7, turning his clear advantage into a clear disadvantage. In fact, this had happened twice before in Bill Wall games, and they showed "1-0" in 10 moves or less (in a third game, Black struggled on for 10 more moves). So, Bill takes his advantage and moves on to the win. Things were not that simple, though. Watch. Wall, Bill - Anonymous lichess.org, 2019 1.e4 e5 2.Nf3 Nc6 3.Bc4 Bc5 4.Bxf7+
4...Kxf7 5.Nxe5+ Nxe5 6.Qh5+ Ke6 7.f4 g6
It is fun, kicking White's Queen. However, this move gives up the Knight at e5 and the Rook at h8. (If you worry about being greedy, you can substitute capturing the Bishop at c5.) 8.Qxe5+ Kf7 9.Qxh8 Here, Black resigned in Wall, Bill - DGTS, FICS, 2011. 9...Qh4+ 10.g3 Here, Black resigned, in Wall, Bill - Guest1681797, PlayChess.com, 2013, 10...Qh3 Or 10...Qf6 11.Qxh7+ Qg7 12.Qxg7+ Kxg7 13.Nc3 d6 14.Nd5 Bb6 15.b3 Bg4 16.Bb2+ Kh7 17.Nxb6 axb6 18.Kf2 Re8 19.h3 Be6 20.g4 Black resigned, Wall, Bill - Guest862403, Play.Chess.com 2014. 11.d3 d5
So, here we go. White is up the exchange and a couple of pawns. His Queen is a bit uncomfortable in the corner, at h8, however, and his King is not altogether safe. What to do? 12.Qe5 Perfectly reasonable. Anyone who has ever seen Amateur - Blackburne, London, 1884(see "Nobody expects the Jerome Gambit!" and "Jerome Gambit: Dr. Harding Checks In") would not wait for ...Nf6, locking in White's Queen. Now, White goes on to win in three dozen more moves. But - wait. Stockfish 10, recommends, instead, 12.f5!?, with a whole lot of crazy tactics - 12...Bxf5 (not 12...gxf5 because of 13.Nd2 dxe4 14.Nxe4!? fxe4 15.Rf1+ and attack) 13.Qe5 and the f-file will be trouble for Black, especially after ...Qg2 is met by Rf1. Just one example of play is 13...dxe4 14.Qxc5 exd3 15.Qxc7+ Kf8 16.Qc5+ Kg7 17.Nc3 Qg2 18.Rf1 dxc2 19.Be3 Re8 20.g4 Qxg4 21.Kd2 - and you can see why Bill simply chose to remove his Queen! 12...c6 Black supports his d-pawn - but Stockfish 10 will have none of it. To keep only about a three-fourths of a pawn behind, Black should try 12...Qg2 13.Rf1 Bg4!? 14.Qxd5+ Kg7 15.Nc3 b6!? when 16.f5 Nf6!? 17.Qc4 (not 17.Qxa8? Bd4! with a forced mate) Qxh2 18.d4 Qxg3+ 19.Rf2 Qg1+ 20.Qf1 Qxf1+ 21.Rxf1 Bxd4 22.fxg6 hxg6 23.Nb5 Be5 24.Bf4 Bxf4 25.Rxf4 g5 26.Rf1 Nxe4 27.Rg1 Nf6 leaves Black with a pawn for the exchange... So - Black's choice of a move is understandable, too. 13.f5 gxf5 14.Nd2 Nf6 15.Nf3 Qg2 16.Rf1 Qxc2
It is humorous to point out that Stockfish 10 sees White as being the equivalent of 4 pieces ahead. I am not sure that Bill's King felt that way! 17.Ng5+ Kg7 18.Bd2 Qxd3 19.exf5 This will support White's Knight when it comes to e6. For sheer madness, take a look at 19.Rf3 Qc4 20.Rf4 19...h6 20.Ne6+ Bxe6
21.fxe6 This is fine, altough Stockfish 10 recommends 21.O-O-O!? Qc4+ 22.Bc3 Bd4 23.Qxd4 Qxd4 24.Rxd4 Bg8 when White would still be up the exchange. 21... Bd4 22.Qc7+ Kh8 23.O-O-O Qc4+ 24. Kb1 Ne4 25. Bc1 Qb4
26.e7 Cold blooded. Others might have returned the exchange with 26.Rxd4 to deal with one threat to b2, or tried 26.Ka1 to avoid the nasty 26...Nc3+ fork. Instead, Bill enlists the "Jerome pawn" in his checkmate threats. 26... Nc3+ 27.Ka1 Nxd1 28.Qd8+ Rxd8 Abject surrender, although 28...Kh7 29.Rxd1 Bg7 30.Qxa8 Qxe7 would also leave him a Rook down. 29.exd8=Q+ Kg7